Getting Started
Pre-requisite information
To understand how MIDIAnimator works, we must first understand how MIDI files work. A MIDI file is a file that contains a list of MIDI tracks. Each MIDI track contains a list of MIDI events. MIDI events can be a note on, note off, control change, etc.
Learn more about MIDI here: https://www.midi.org/specifications-old/item/the-midi-1-0-specification
In MIDIAnimator, MIDI tracks are represented in the form of Blender collections. Each collection contains a list of objects, in which each object has a note number assigned to it. Collections have different animation types that influence the objects in that colleciton.
These collections only contain the objects that you want to animate.
Glossary
MIDI: Musical Instrument Digital Interface. A protocol that allows electronic instruments to communicate with each other.
MIDI File: A file that contains a list of MIDI tracks. Each MIDI track contains a list of MIDI events. MIDI events can be a note on, note off, control change, etc.
MIDI Track: A list of MIDI events. Each MIDI track has a name. For example, “Steinway Grand Piano” is a MIDI track.
MIDI Note: A MIDI event that represents a note on or note off. It contains a note number, velocity, and a time.
Blender Collection: A collection of objects. For example, you can have a collection of cubes, a collection of spheres, etc.
Blender Object: An object in Blender. For example, a cube, a sphere, etc.
Note Number: A number that represents a note, defined in the MIDI standard. For example, C3 is MIDI note number 60.
Anchor Points: A number that represents when to trigger the animation based on the note on time. For example, if you had a note that came on at frame 30, and you want the animation to trigger on frame 25, you would set the note anchor point to -5 (start 5 frames before the note time).
Reference Object: Also sometimes referred to as “Animation Object” (however, deprecated). An object that contains the animation data, and will not be used for the actual animation itself. This object only serves as a reference for the target animation. For example, a cube that has keyframed animation.
Target Object: An object that will be animated. Does not contain any animation. For example, a cube that will be animated.
Getting Started with MIDIAnimator
Download Template Scene
If you havent read the Glossary, please do so now! I promise it will make more sense!
To start writing your own MIDIAnimation programs, first, you will need a scene to work with. You can download the template scene here and a demo MIDI file here.
Note
It is reccomended that you keep your scene organized and tidy. Make good names for collections and objects. In general, it is common practice to place reference objects within a collection named “Animation” and apply a prefix of “ANIM_” to each reference object. This approach helps to organize and differentiate the reference objects from other elements in the program. By following this convention, it becomes easier to locate and manage all reference objects in the scene.
Step 1: Setup Collections for Animation:
To setup a collection for animation:
Create a collection in the
Outlinerpanel. Name it something meaningful. For example, “Cubes”.Open up the N-key panel in the
3D workspace. Click on theMIDIAnimatortab. When you click on a collection in theOutliner, you will see the “Edit Collection Information” panel pop up, in which you can change the instrument type & its properites (if applicable).
Note
There are several different instrument animation types to choose from. In this guide, we will be only looking at “Evaluate” as it is the most basic out of them all.
Change the instrument animation type to “Evaluate” if it is not already chosen.
Step 2: Assign Note Numbers to Objects
To assign note numbers to objects, open up the N-key panel in the 3D workspace. Click on the MIDIAnimator tab. When you click on an object, you will see the “Edit Object Information” panel pop up, in which you can assign a note number to the object.
Note
Objects can have more than one note number and multiple objects can have the same note number.
Take for example this cube. It is assigned note number 58.
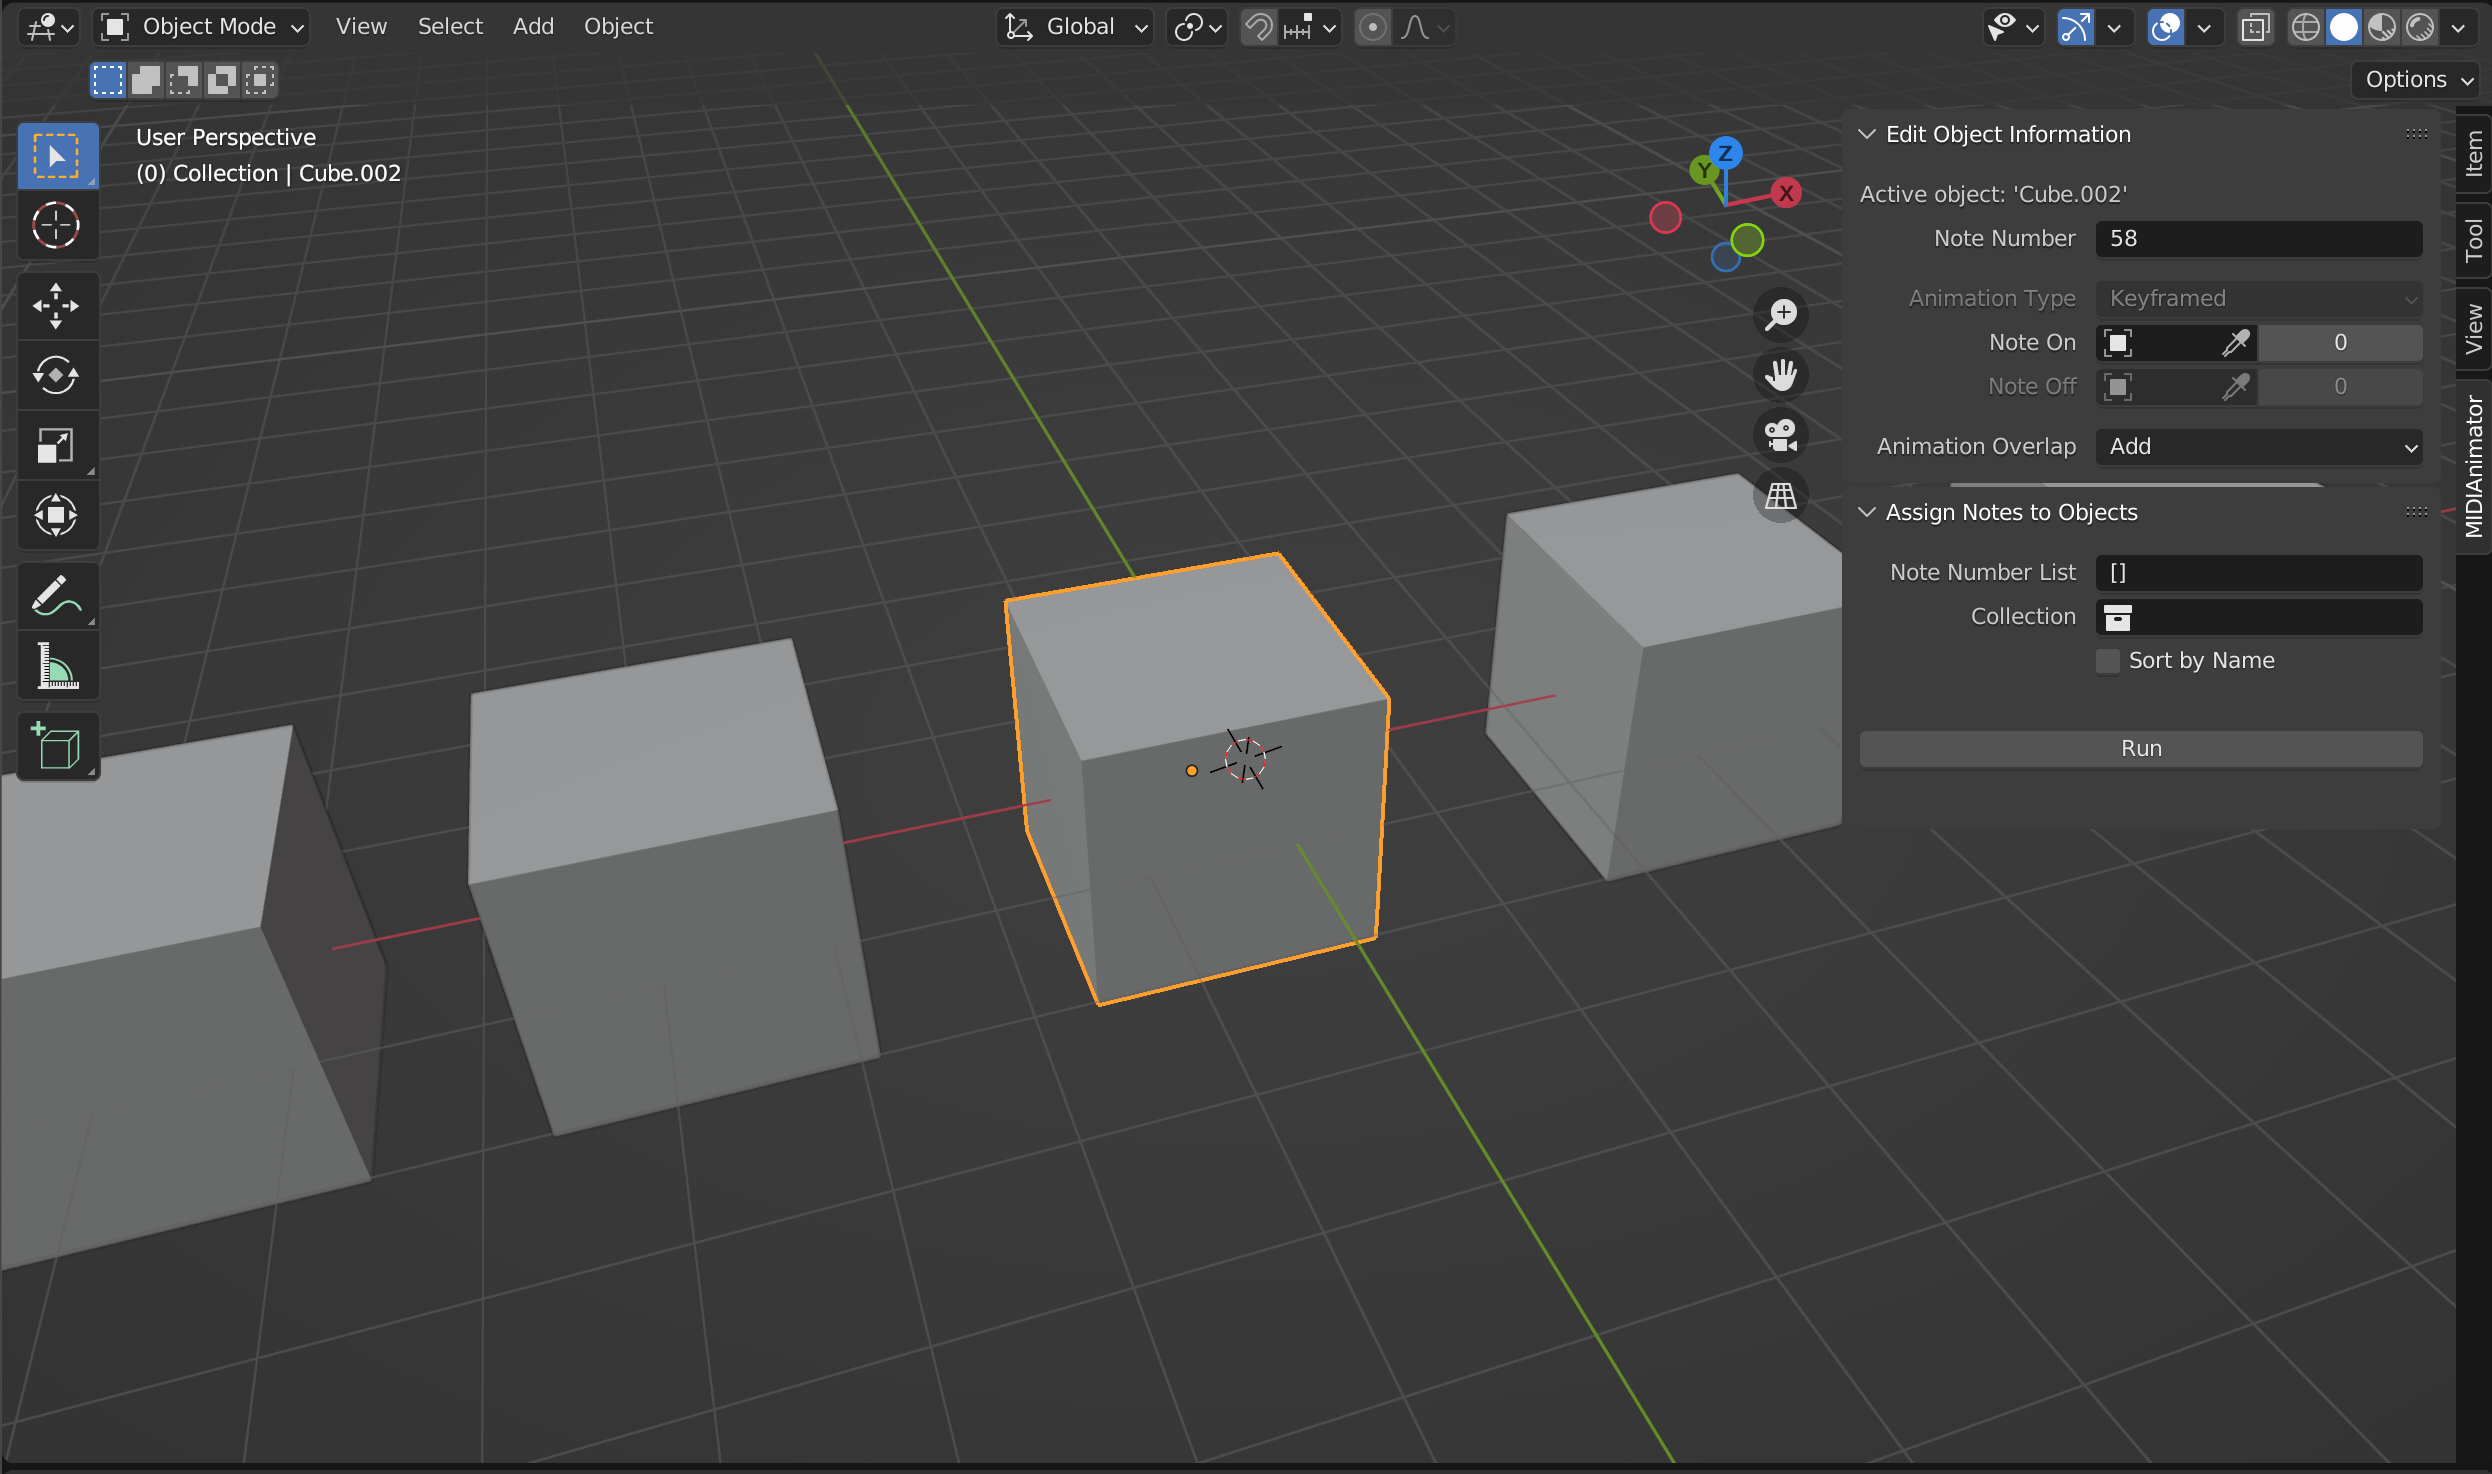
You can also assign the object a note name, which is the name of the note instead. For instance, C3 is MIDI note number 60.
Aside: Batch Assigning Note Numbers
Instead of assigning note numbers 1 by 1, you can also assign them in batches.
Option 1
Note
This is NOT the only way to assign note numbers to objects. Please keep reading if you do not want to tediously rename objects with their note names.
In the N-key panel, under Assign Notes to Objects, you can input note numbers into a list and pick the collection where the objects are.
To know which note number gets each object, you can use the naming syntax {objectName}_{noteNumber}:
objectNameis the name of your object. This can be anything.followed by an
_(underscore)noteNumberis the note number for the object. Can be either a MIDI note number or a note name.
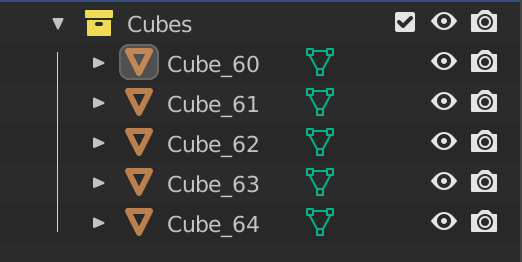
Here is an example of a properly-named collection of objects ready to be assigned note numbers.
To assign all of the note numbers to the objects, simply pick the collection in the Assign Notes to Objects panel and press Run. No need to input a list.
Option 2
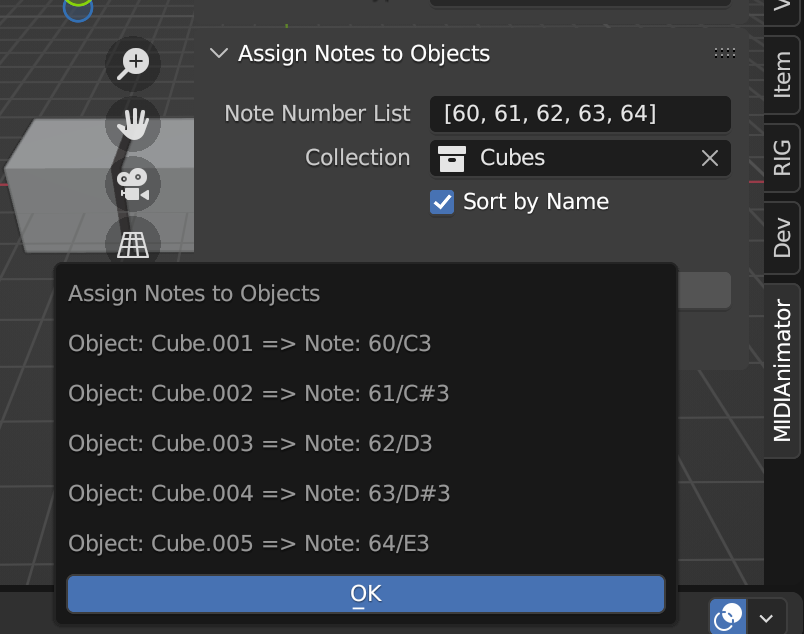
Alternatively, you can have the objects sorted by their current names (without any special naming syntax) and have the objects be sequentially assigned by checking Sort By Name.
When you hit Run, you will see a preview on how the note numbers will be assigned.
Option 3: Python Script
Alternatively, you can also assign note numbers using a script:
import bpy

notes = [60, 61, 62, 63, 64]
collection = bpy.data.collections['Cubes'].all_objects

# you might want to sort the collection by name first, so that the objects are in the correct order
# collection = list(bpy.data.collections['Cubes'].all_objects).sort(key=lambda obj: obj.name)

for obj, note in zip(collection, notes):
    # Because `note_number` is a string property, we must convert it to a string
    obj.midi.note_number = str(note)
Step 3: Assigning Reference Animations to Target Objects
To assign reference animations to target objects, right click the object you want to assign an animation to (target), and look in the N-key panel in the 3D viewport.
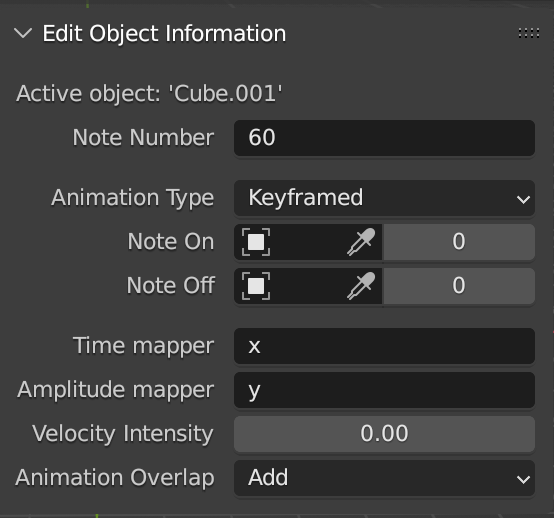
Currently, there is only 1 type of object-level animation, which is called “Keyframed”. (Keyframed takes an object as input, analyzes it’s FCurves, and duplicates the animation across the timeline).
To use location, rotation and scale:
Keyframe the reference object just like you would any normal animation.
Select your target object, and in the Note On/Off object field, assign it to the reference object.
To create custom properties and have them duplicated across all objects, first:
Create a custom property in the object tab on your reference object.
Open the settings up and change the name to something meaningful.
Change the default value to 0 (you might want to change the min/max’s beyond their default values).
Press OK, and keyframe the property field with the hotkey I. Keyframe it like you would any other animation.
Select your target object, and in the Note On/Off object field, assign it to the reference object.
Thats it! Objects will then have the custom property duplicated to them once the script is executed. You can use this also do drive other parameters with Blender’s Drivers & for use in Geometry Nodes.
To use shape keys for animation:
Create a shape key on the reference object. The object doesn’t have to have the same deformations.
Rename the shape key with the identical name as the shape key found on the target object.
Next, keyframe the value field with hotkey I. Keyframe it like you would any other animation.
Select your target object, and in the Note On/Off object field, assign it to the reference object.
Thats it! If the shape keys do not exist on the target objects, it will simply be ignored. If it finds a matching shape key name, it will be animated.
Important
ALL animation on the reference object must be relativie to 0. The first keyframe must start at 0, and the last keyframe must return to 0. If this is not followed, resulting animation will have side-effects.
Anchor Points
Note anchor points tell you when to trigger the animation based on the note on time. For example, if you had a note that came on at frame 30, and you want the animation to trigger on frame 25, you would set the note anchor point to -5 (start 5 frames before the note time).
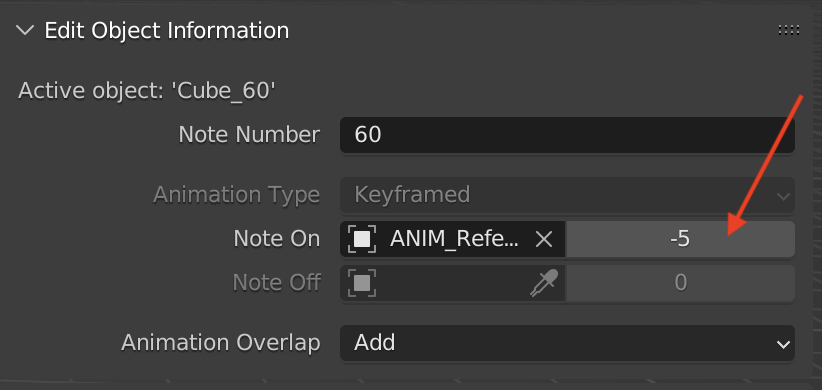 Note anchor points are located next to the Note On/Off object field.
There are different ways to deal with overlapping animation. Currently, the only way researched is to “add” the motion together. This works great for oscillating motion, but for other types of motion, it may give undesirable results. More overlapping methods will be added as they are researched.
Step 4: Writing the Code
Note
A node-based workflow will be coming in the next few updates. Both options will still be available.
Note
It is highly reccomended that you know some programming basics. If you are new to programming, I suggest you check out Programwiz to learn the absolute basics of Python.
Open up a Text Editor window. I also suggest you open up a Console Window if you want to print debug messages to the screen.
Here is a sample script:
(Note: In the demo MIDI file, the MIDI track is called “Demo”)
import bpy
from MIDIAnimator.src.animation import MIDIAnimatorNode
from MIDIAnimator.data_structures.midi import MIDIFile

file = MIDIFile("/midi/path/demo.mid")
# create a MIDITrack object by finding the track in the file
# In the demo MIDI file, the MIDI track is called "Demo"
demoTrack = file.findTrack("Demo")

animator = MIDIAnimatorNode()
animator.addInstrument(midiTrack=demoTrack, objectCollection=bpy.data.collections['Cubes'])

# Animate the MIDI file
animator.animate()
The first 3 lines are importing the necessarry classes and functions into Python.
import bpy imports the bpy module into Blender, Blender’s API.
from MIDIAnimator.src.animation import MIDIAnimatorNode for interacting with the Blender scene and animating the objects
from MIDIAnimator.data_structures.midi import MIDIFile for reading MIDI files
Next, we need to find where the MIDI file is stored on the computer.
MIDI File Directories
Windows File Directories
Type your directories with forward slashes (“/”) rather than backslashes (”\”).
file = MIDIFile("C:/Users/path/to/file.mid")
If you prefer to use backslashes, put the letter “r” in front of the directory string.
For example: file = MIDIFile(r"C:\Users\path\to\file.mid")
or
Type your directories with double back slashes.
For example: file = MIDIFile("C:\\Users\\path\\to\\file.mid")
Mac/Linux File Directories
Type your directories like you normally would in a command-line enviroment.
Typical Mac directories: file = MIDIFile("/Users/path/to/file.mid")
Typical Linux directories (varies by distro): file = MIDIFile('/home/username/path/to/file.mid")
Tip
Blender relative paths work! Just type // infront of the filename, and Blender will attempt to find the MIDI file in the same directory as the .blend file. Make sure to save your work first!
Now that you have the file, there are a number of functions you can perform to pull data out of the MIDI file.
The most commonly used one by far isfindTrack(), in which it takes the name of the MIDI track and returns theMIDITrackobject (which you will assign to a variable).
pianoTrack = file.findTrack("Steinway Grand Piano")
Tip
Unsure of what tracks you have in your MIDI file? Print them to the Console Window with this short code snippet:
file = MIDIFile("/path/to/midi/file.mid")
print(file.listTrackNames())
Next, we need to setup a
MIDIAnimatorNode. This will be the interface to tell MIDIAnimator what instruments to animate.
The first step in this process is to create a MIDIAnimatorNode() object and assign it to a variable:
animator = MIDIAnimatorNode()
Next, we will add all of the instruments we want to animate. In the case of the Cubes collection, we will add it using the
addInstrument()method:
animator.addInstrument(midiTrack=pianoTrack, objectCollection=bpy.data.collections['Cubes'])
Note
See Animation Types for more details on other instrument-level animation types.
Finally, we call the
animator.animate()method, which animates all instruments that were added to theMIDIAnimatorNodeobject.
Step 5: Running the Program
If all went well, you should see things moving to the notes of the MIDI file!
Warning
All objects in the collection passed in (for example, the “Cubes” collection) that have animation data will be cleared and overwitten.
Note
If you get stuck or run into issues, feel free to open an issue on the GitHub, or join the Animusic Discord and post in the #midianimator-discussion channel. Ping @iMac and he will be able to assist you.